For many boaters(myself included), anchoring seems to be one of the most difficult skills to master. Even with all of the properly sized equipment for the boat, holding position can be a serious headache. After doing some research and making a few changes to my gear and set up routine, everything clicked and anchoring became a little less painful. Here is a little anchor terminology, and a few tips for more successful anchoring.
Before we get into this, Id like to discuss a serious safety issue. When you are anchoring a boat in current, anchor with the boat facing upstream. You should never anchor the back of the boat in current! If the front anchor were to fail in any way, the boat will turn around and can be easily pulled under by the back anchor and the amount of weight of water pushing against the transom. If your boat is swinging in the current, try using a drift sock or drift bucket off of the stern. Always have a sharp knife at the ready just in case you need to drop an anchor in a hurry.
Cleat: A t-shaped metal or plastic device used to secure a dockline or anchor line to a boat.
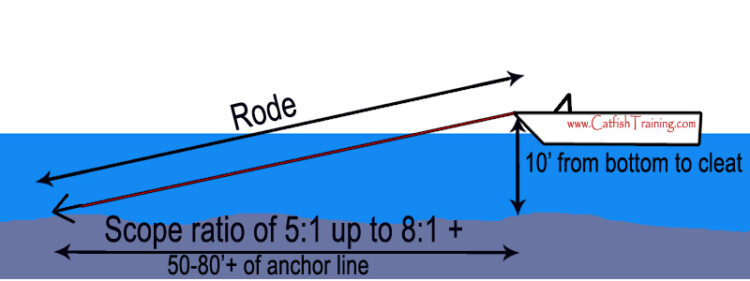
Scope: The ratio of anchor line payed out in relation to the water depth + the distance from water surface to the cleat.
Rode: A length of cable, chain, and/or rope, attached between an anchor and a boat.
1. Use proper scope
Probably the most common cause of an unsuccessful anchor is too little scope. Getting an anchor to properly “set” requires a longer rode than most would think. For calm water, a scope of 5:1 can usually get the job done. In rough water or heavy current the scope may need to be increased to 8:1 or more. For example: lets say we are anchoring on calm water about 10′ deep. To get a scope of 5:1 we will need 50′ of anchor line payed out. In rougher conditions, it may take 80′ or more to hold securely. Think of all the places you regularly fish and their depths. Make sure you have enough anchor line to achieve an 8:1 scope on your deepest fishing location.
2. Use an anchor chain
Adding an anchor chain between the anchor and anchor rope can help with setting the anchor as well as prevent anchor lines from being damaged by sharp bottom objects. The recommended length of chain is usually around half of the boat length. I personally use about 5 feet or so, this seems to be enough weight to get the anchor aimed in the correct angle to set properly. While there are many types of “anchor chains” available, galvanized chain from the hardware store is usually cheaper and will serve the same purpose(galv coating can damage aluminum so do not leave the chain in contact with aluminum boat surfaces).
3. In current try a drift sock
A drift sock can be used when anchoring to help stop the boat from swaying as much. Set the front anchor as you normally would in current and drop a drift sock out of the back of the boat. 5-10′ of line should be plenty of line between the boat and drift sock in most cases. There are also
harnesses available that come equipped a float so a dropped sock can be retrieved. Drift socks are typically used to control the speed of a boats drift on lakes and reservoirs. We will show you more ways to use drift socks in upcoming articles.
4. Choose an appropriate anchor
An anchor should be chosen by the size of the vessel as well as bottom surface type where you will be anchoring. If you are unsure what anchor to get, check out this article: Choosing the Right Anchor. Most of these tips will be ineffective if not used in conjunction with a proper anchor.
I am sure there are many other great anchoring tips but, thsese seem to be the most significant and overlooked. Get these things all in place and perfect anchors are just a little practice away! Have any great anchoring tips? Anchoring questions? Please leave us a comment below.


